OutBook Developer Guide
Table of Contents
- Acknowledgements
- Setting up, getting started
- Design
- Implementation
- Planned Enhancements
- Effort
- Documentation, logging, testing, configuration, dev-ops
- Appendix: Requirements
- Appendix: Instructions for manual testing
Acknowledgements
Setting up, getting started
Refer to the guide Setting up and getting started.
Design
.puml & .uxf files used to create diagrams in this document docs/diagrams folder. Refer to the PlantUML Tutorial at se-edu/guides (for .puml) or UMLet (for .uxf) to learn how to create and edit diagrams.
Architecture

The Architecture Diagram given above explains the high-level design of the App.
Given below is a quick overview of main components and how they interact with each other.
Main components of the architecture
Main (consisting of classes Main and MainApp) is in charge of the app launch and shut down.
- At app launch, it initializes the other components in the correct sequence, and connects them up with each other.
- At shut down, it shuts down the other components and invokes cleanup methods where necessary.
The bulk of the app’s work is done by the following four components:
-
UI: The UI of the App. -
Logic: The command executor. -
Model: Holds the data of the App in memory. -
Storage: Reads data from, and writes data to, the hard disk.
Commons represents a collection of classes used by multiple other components.
How the architecture components interact with each other
The Sequence Diagram below shows how the components interact with each other for the scenario where the user issues the command delete 1.

Each of the four main components (also shown in the diagram above),
- defines its API in an
interfacewith the same name as the Component. - implements its functionality using a concrete
{Component Name}Managerclass (which follows the corresponding APIinterfacementioned in the previous point).
For example, the Logic component defines its API in the Logic.java interface and implements its functionality using the LogicManager.java class which follows the Logic interface. Other components interact with a given component through its interface rather than the concrete class (reason: to prevent outside component’s being coupled to the implementation of a component), as illustrated in the (partial) class diagram below.

The sections below give more details of each component.
UI component
The API of this component is specified in Ui.java

The UI consists of a MainWindow that is made up of parts e.g.CommandBox, ResultDisplay, PersonListPanel, StatusBarFooter etc. All these, including the MainWindow, inherit from the abstract UiPart class which captures the commonalities between classes that represent parts of the visible GUI.
The UI component uses the JavaFx UI framework. The layout of these UI parts are defined in matching .fxml files that are in the src/main/resources/view folder. For example, the layout of the MainWindow is specified in MainWindow.fxml
The UI component,
- executes user commands using the
Logiccomponent. - listens for changes to
Modeldata so that the UI can be updated with the modified data. - keeps a reference to the
Logiccomponent, because theUIrelies on theLogicto execute commands. - depends on some classes in the
Modelcomponent, as it displaysPersonobject residing in theModel.
Logic component
API : Logic.java
Here’s a (partial) class diagram of the Logic component:

The sequence diagram below illustrates the interactions within the Logic component, taking execute("delete 1") API call as an example.

DeleteCommandParser should end at the destroy marker (X) but due to a limitation of PlantUML, the lifeline reaches the end of diagram.
How the Logic component works:
- When
Logicis called upon to execute a command, it is passed to anAddressBookParserobject which in turn creates a parser that matches the command (e.g.,DeleteCommandParser) and uses it to parse the command. - This results in a
Commandobject (more precisely, an object of one of its subclasses e.g.,DeleteCommand) which is executed by theLogicManager. - The command can communicate with the
Modelwhen it is executed (e.g. to delete a person). - The result of the command execution is encapsulated as a
CommandResultobject which is returned back fromLogic.
Here are the other classes in Logic (omitted from the class diagram above) that are used for parsing a user command:

How the parsing works:
- When called upon to parse a user command, the
AddressBookParserclass creates anXYZCommandParser(XYZis a placeholder for the specific command name e.g.,AddCommandParser) which uses the other classes shown above to parse the user command and create aXYZCommandobject (e.g.,AddCommand) which theAddressBookParserreturns back as aCommandobject. - All
XYZCommandParserclasses (e.g.,AddCommandParser,DeleteCommandParser, …) inherit from theParserinterface so that they can be treated similarly where possible e.g, during testing.
Model component
API : Model.java

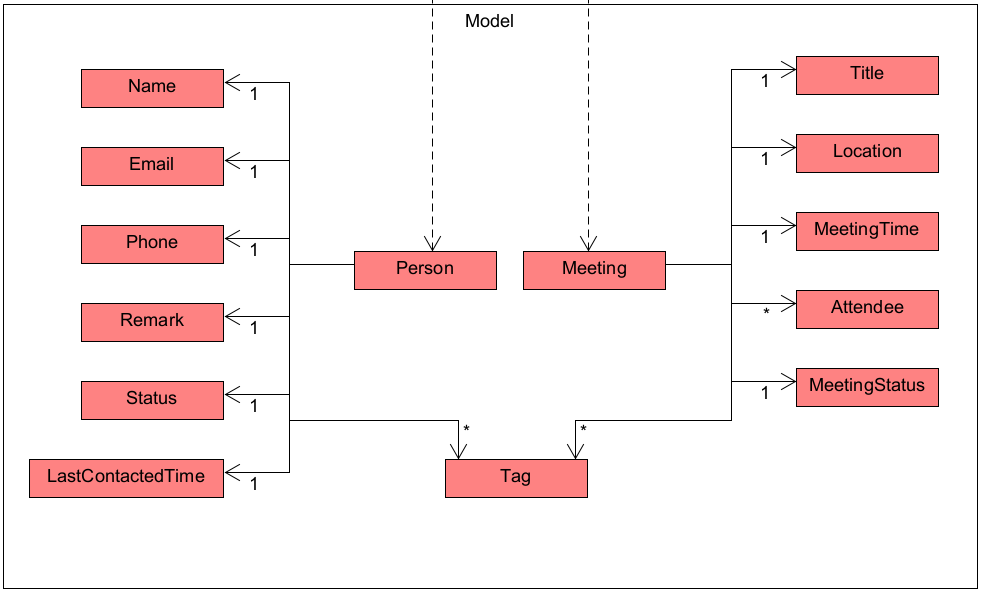
The Model component,
- stores the address book data i.e., all
PersonandMeetingobjects (which are contained in aUniquePersonListandUniqueMeetingListobject). - stores the currently ‘selected’
PersonandMeetingobjects (e.g., results of a search query) as a separate filtered list which is exposed to outsiders as an unmodifiableObservableList<Person>andObservableList<Meeting>that can be ‘observed’ e.g. the UI can be bound to this list so that the UI automatically updates when the data in the list change. - stores a
UserPrefobject that represents the user’s preferences. This is exposed to the outside as aReadOnlyUserPrefobjects. - does not depend on any of the other three components (as the
Modelrepresents data entities of the domain, they should make sense on their own without depending on other components) - The Tag is a factory class that keeps its own HashMap of the Tags it has created before, thus it ensures that every Tag is unique and can be referenced by all Person and Meetings.
Storage component
API : Storage.java

The Storage component,
- can save both address book data and user preference data in JSON format, and read them back into corresponding objects.
- inherits from both
AddressBookStorageandUserPrefStorage, which means it can be treated as either one (if only the functionality of only one is needed). - depends on some classes in the
Modelcomponent (because theStoragecomponent’s job is to save/retrieve objects that belong to theModel)
Common classes
Classes used by multiple components are in the seedu.addressbook.commons package.
Implementation
This section describes some noteworthy details on how certain features are implemented.
Edit Contacts and Meetings feature
Both the edit contact command editc and edit meeting command editm are implemented quite similarly due to the similarities between the Person and Meeting classes.
This section shall therefore only go in deep detail for the implementation of the editm command. However, the editc equivalent of certain commands used by editm will be detailed, such that the implementation of editc can be fully derived.
The class diagrams for both edit commands differ from the other commands in that an additional EditMeetingDescriptor or EditPersonDescriptor class is used to create the commands. The diagram for editm is as seen below.
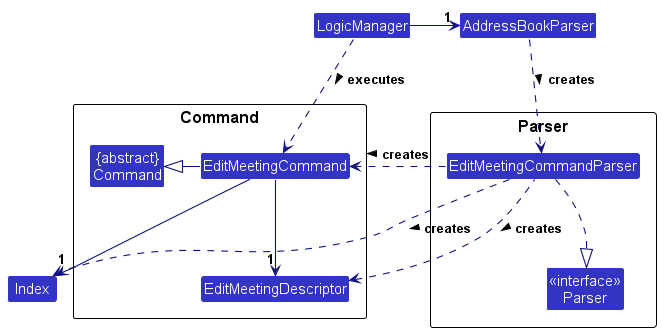
To start off, both editc and editm take in an index as their first argument, which refers to a Person in the displayed person list, or a Meeting in the displayed meeting list respectively.
Next, both commands take in a variable number of optional arguments based on the arguments used by the addc and addm commands. This allows the user to input only the fields they wish to edit in the chosen Person or Meeting object, as opposed to having to type in every field.
Using editm 3 m/Friend meetup a/Mall as an example, when input by the user, an instance of an EditMeetingCommand (EditCommand in the case of editc with its respective Person fields as arguments) is created as shown in the following Sequence Diagram.

As seen above, before the EditMeetingCommandParser creates the EditMeetingCommand object, it first creates an instance of an EditMeetingDescriptor (EditPersonDescriptor in the case of editc). This descriptor stores the new information of the fields to be edited based on the user input. From our example, it would store the Title: Friend meetup and Location: Mall.
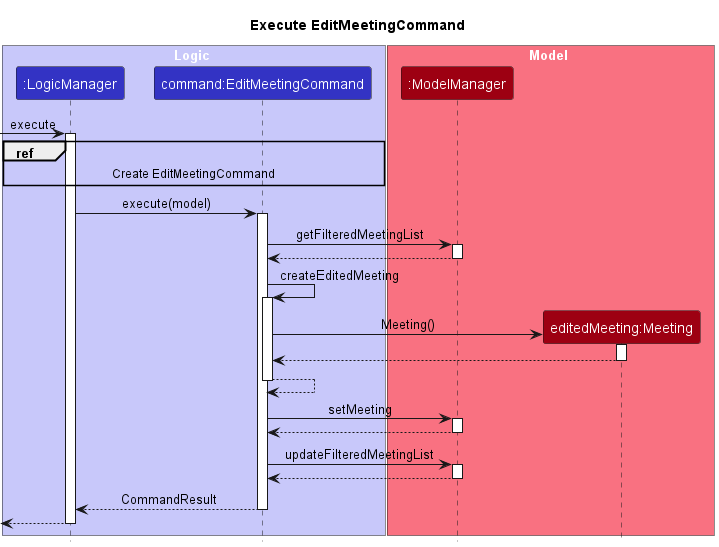
Once the instance of EditMeetingCommand is created, it is executed by the LogicManager. During execution, the current Meeting object referenced by the input index (3 in our example) is obtained from the meeting list returned by getFilteredMeetingList.
Next, a new instance of Meeting is created using the fields from the EditMeetingDescriptor. Any fields not present in the descriptor us obtained from the old Meeting object from the previous step, as these fields do not need to be edited. From our example, the START, END, TAG and ATTENDEE_LIST will be obtained from the current Meeting instance as the Descriptor only contains the TITLE and LOCATION fields.
Finally, the old Meeting object is replaced with the new instance, and the ModelManager is updated. These steps are denoted in the Sequence Diagram below.
Design Considerations and Rationale
-
editmallows the user to edit every field ofMeetingapart from the attendee list.- The commands
addmcandrmmcare used to modify the attendee list of a meeting instead. - This retains the identity of the edit commands as commands that modify field information, as opposed to
addmcandrmmcwhich can be seen as commands that link multiple objects together.
- The commands
View Contacts and Meetings feature
Implementation
Just like the Edit commands, the view contact command viewc and the view meeting command viewm are implemented in the exact same way due to the similarities between the Person and Meeting classes.
As such, this section shall only detail the implementation of the viewc command. However, the implementation of viewm can be derived by replacing some Person related functions/classes/objects with its Meeting counterpart.
viewc and viewm both take in an index as their only argument, which refers to a Person in the displayed person list, or a Meeting in the displayed meeting list respectively.
Using viewc 2 as an example, when input by the user, an instance of a ViewContactCommand (ViewMeetingCommand in the case of viewm) is created as shown in the following Sequence Diagram. This step does not differ from the way other commands have been shown to be created. The argument for our example would just be 2, which would be stored as the targetIndex field of the ViewContactCommand object.

Once the instance of ViewContactCommand is created, it is executed by the LogicManager. During execution, the command stores the contents of its targetIndex field in the ModelManager using its setViewedPersonIndex method as shown in the next Sequence Diagram. For ViewMeetingCommand it would use the setViewedMeetingIndex method instead.
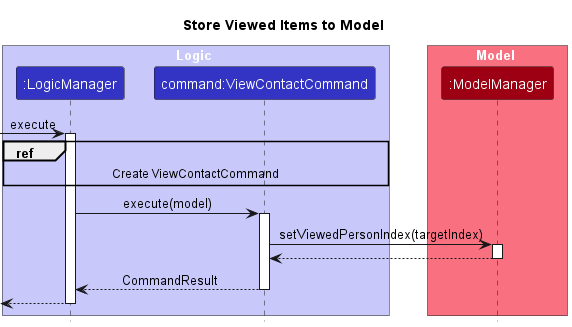
Once the indexes of the Person and Meeting objects to view (if any) are stored in ModelManager, their corresponding Person and Meeting objects (in this case the 2nd Person as displayed on the list) are obtained by the MainWindow as a Pair through the getViewedItems method of the LogicManager class. As such, both objects can then be forwarded to the InfoDisplayPanel using setViewedModel, which then displays detailed information of both objects. This process is denoted in the final Sequence Diagram below.
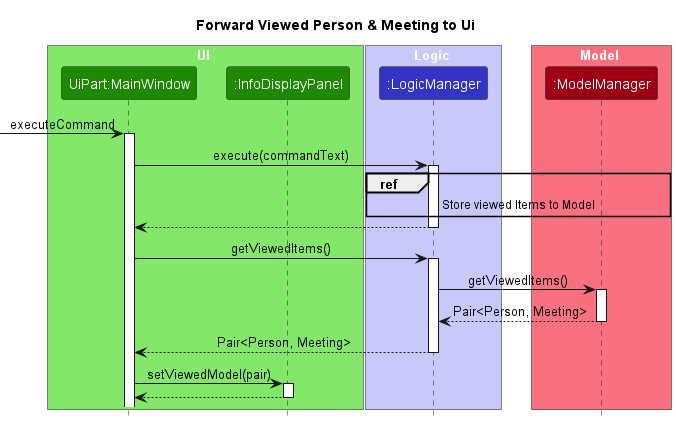
Design Considerations and Rationale
- Passing viewed
PersonandMeetingfrom Model to Ui through Logic:-
ViewContactCommandandViewMeetingCommandonly have access to theModelManagerwhileMainWindowonly has access toLogicManager. - To prevent excessive and unnecessary coupling for the sake of two commands, it is deemed more worthwhile to use
LogicManageras a proxy betweenModelManagerandMainWindow, especially sinceLogicManageralready had access toModelManager.
-
- Storing the viewed
PersonandMeetingas fields inModelManager:- The behaviour of
ModelManageris not contradicted as it is already responsible for storing both the filtered lists ofPersonandMeetingobjects that are displayed in the Ui.
- The behaviour of
- Storing the
Indexof the viewedPersonandMeetingrather than a copy of the objects directly:- Storing a copy of the objects was done initially but led to a display issue.
- When the fields of any currently viewed item are edited, the display does not update as the copy of the original viewed item does not get updated as well.
- Storing the
Indexfixes this issue as thePersonandMeetingobjects are only forwarded to the Ui after the execution of a command.
- As a continuation to point 3, this leads to a new issue with commands that can modify the display list length/order such as
listc,editc,findc,deletec,addcand their meeting variants.- Since the stored
Indexmay now reference a different item, or even point out-of-bounds in the case of the display list being shortened, this implementation may potentially lead to unpredictable results for both view commands. - For the case of
addc,addm,listc,listm,editcandeditm, this is judged to not be an issue as the view commands still obey their definition of displaying the item at a specified list index.- For both edit commands, it is also more important that they can display dynamic updates.
- For the case of
deletec,deletem,findcandfindm, the storedIndexis set to null to prevent potential out-of-bounds error.
- Since the stored
Find meeting feature
Behaviour and Implementation
The find meeting command is facilitated by GeneralMeetingPredicate that by itself is the combined predicate for all the meeting data fields. It is placed within the Model component and is only dependent on other predicate classes and Meeting.
findm is supported by 5 sub-predicates that would search their respective fields.
- m/TITLE_KEYWORDS — Finds meetings which
Titlecontain any of the keywords given usingTitleContainsKeywordsPredicate. - a/LOCATION_KEYWORDS — Finds meetings which
Locationcontain any of the keywords given usingLocationContainsKeywordsPredicate. - n/ATTENDEE_KEYWORDS — Finds meetings which set of
Attendeecontain any of the keywords given usingAttendeeContainsKeywordsPredicate. - t/TAG_KEYWORDS — Finds meetings which set of
Tagcontain any of the keywords given usingTagContainsKeywordsPredicate. - s/START e/END — Finds meetings that fall within the range of time given by START & END using
MeetingTimeContainsPredicate. (Both START & END must come together)
All of these fields are optional and typing findm alone will not impose any predicates, except MeetingTimeContainsPredicate which will give the largest LocalDateTime range possible.
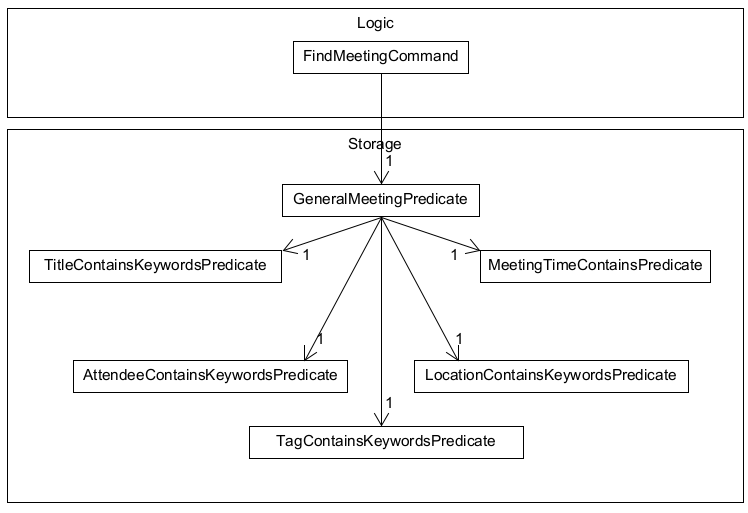
Given below is an example usage scenario and how the findm command behaves at each step.
Step 1. The user executes findm m/meeting command to find all meetings that have the keyword meeting in their title. This results in the logic component calling parse from the AddressBookParser object to make a FindMeetingCommandParser object. This will parse the arguments available and create the GeneralPredicateMeeting object and FindMeetingCommand object.
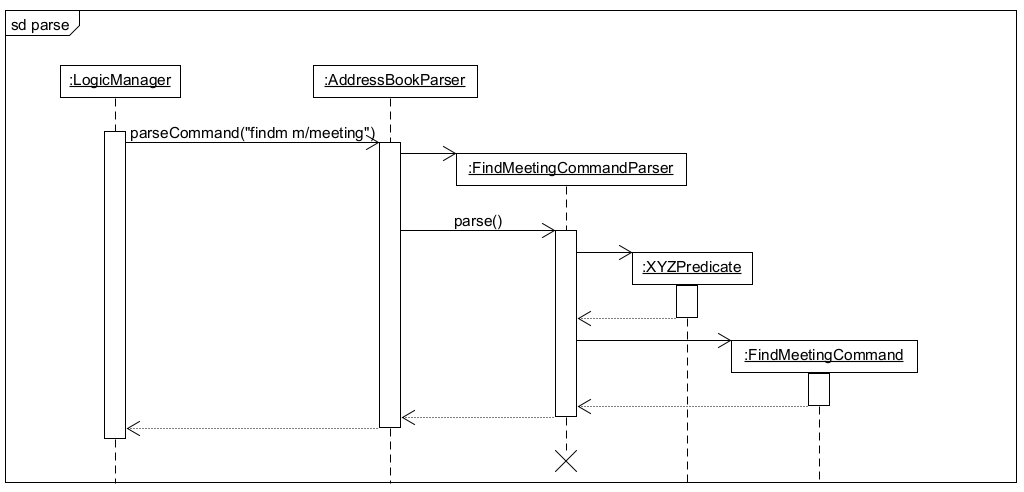
Step 2. The FindMeetingCommand will be immediately executed and will call setPredicate(GeneralMeetingPredicate) from Model. The GeneralMeetingPredicate will be used on all meetings, meetings which pass all 5 predicates are shown in MeetingSchedulePanel. After which FindMeetingCommand and the predicate objects will no longer be referenced.
The following diagrams show the entire sequence flow for LogicManager#execute() for FindMeetingCommand.

Find Contact is implemented in a similar manner.
Design Considerations and Rationale
- Given the amount of predicates
FindMeetingCommandis supposed to use, every predicate needs to be combined in order to maintain good SLAP.-
GeneralMeetingPredicateis made with the user input KEYWORDS, if there are no inputs for the predicate must return true. - If there are no inputs for s/START and e/END,
FindMeetingCommandParserwill giveMeetingTimeContainsPredicatebothLocalDateTime.MAX&LocaLDateTime.MIN
-
- The coupling between predicate classes and
Logicneeds to be minimal asFindMeetingCommandParsershould only be dependent onGeneralMeetingPredicateandMeetingTime.-
MeetingTimeis needed to check the validity of START and END in order forparse()to stop any invalid inputs, it cannot be removed.
-
Add attendee feature
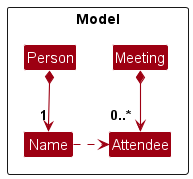
User can specify a Person to add as an Attendee to a specified Meeting.
To avoid storing an entire JsonAdaptedPerson object within the JsonAdaptedMeeting every time a Person is added to a Meeting,
an Attendee class is created to store a unique identifier for the Person added.
As every Person has a unique name in the current iteration of OutBook, it is used as the unique identifier.
Attendee is implemented in the following way:
-
Attendee(attendeeName)– Initialized with a String obtained fromPerson.getName().toString() -
Attendee#getAttendeeName()– Returns a String representing the attendee’s name
The following sequence diagram shows how the add attendee operation works:
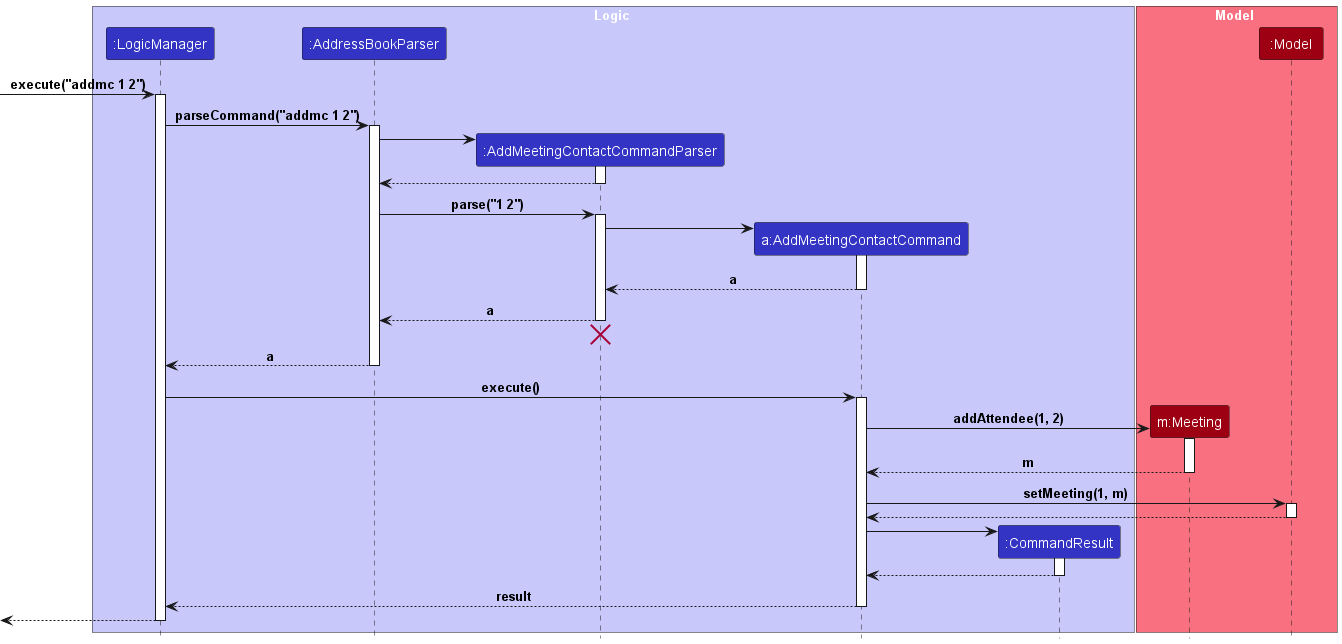
A Person object can be obtained from a Meeting’s list of attendees by searching through UniquePersonList
for a Person with a name matching attendeeName.
Remove attendee feature
User can specify an Attendee to remove from a specified Meeting by specifying its index in the list of Attendees. This is the main motivation behind using a LinkedHashSet for the implementation of the Attendee Set.
The following sequence diagram shows how the remove attendee operation works:
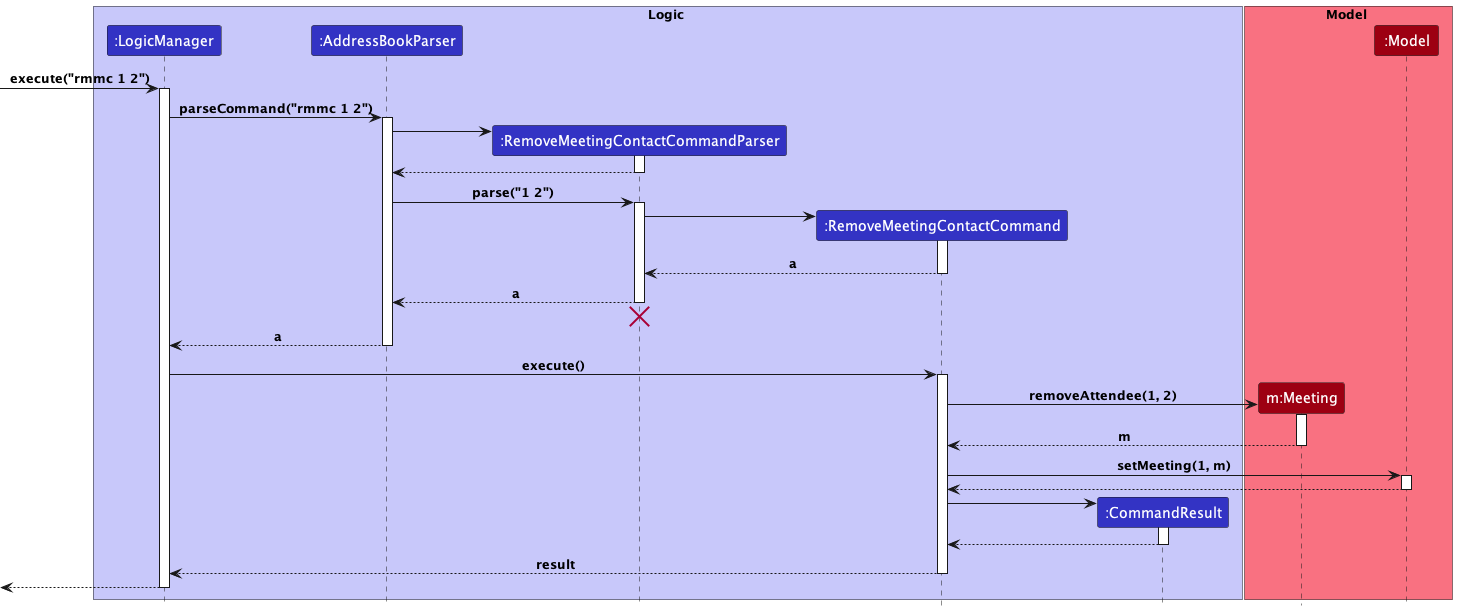
Last Contacted Time feature
Keeping track of the user’s last meeting with their contact is facilitated by the addition of a LastContactedTime object to Person.
Thus, each instance of Person will contain an immutable LastContactedTime object that stores the user’s last meeting with that contact.
The following steps shows how LastContactedTime is implemented and utilized in the application.
Step 1. The user inputs the addc command into the CommandBox input field, with the added field l/[LAST_CONTACTED_TIME].
The following diagram summarizes steps 2 to 6:
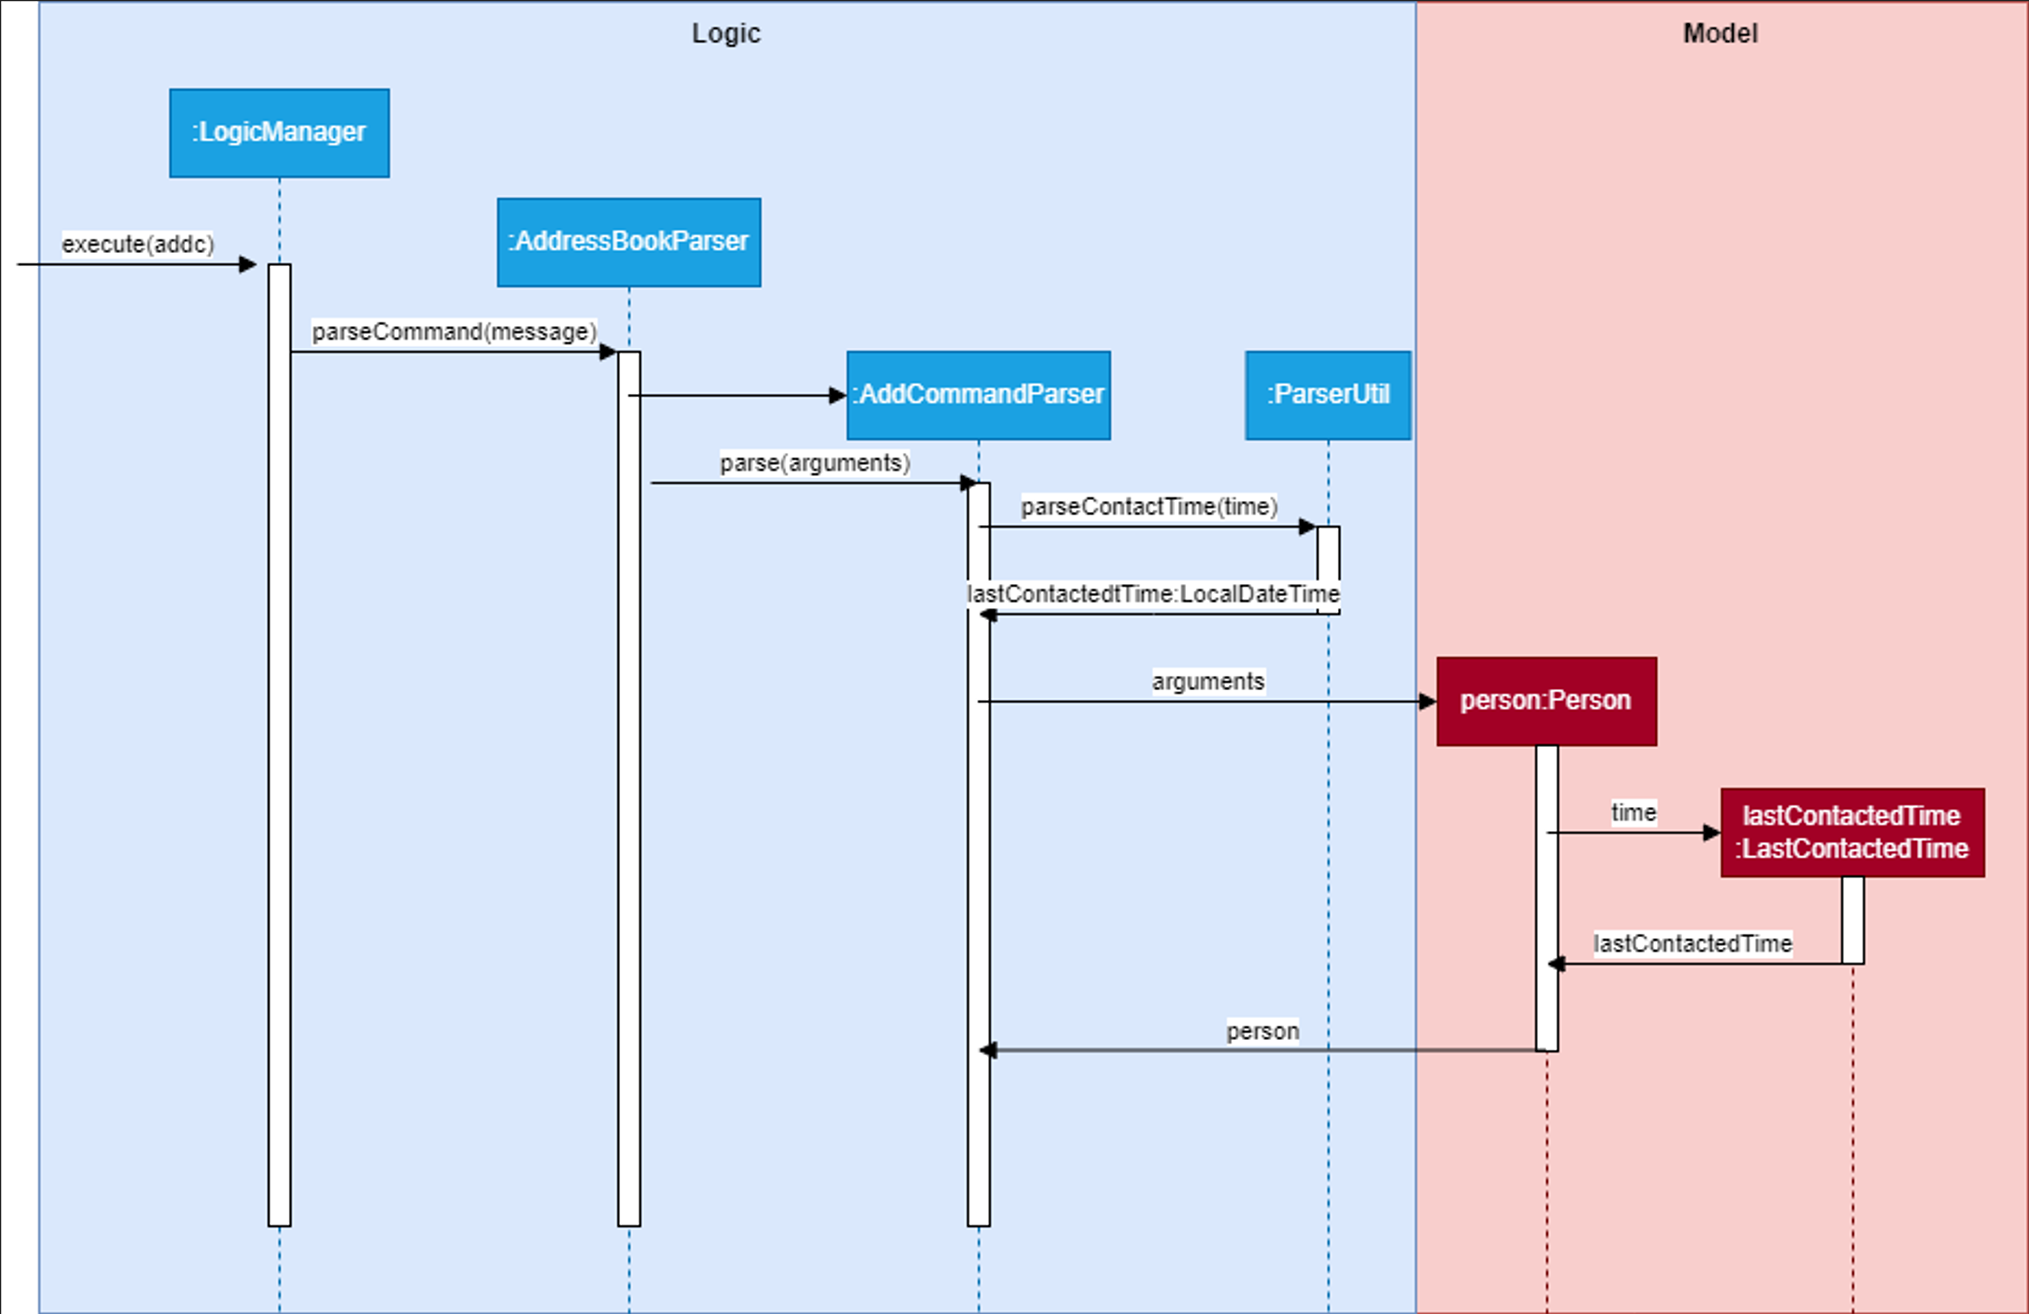
Step 2. Entering a correct command with the Enter key then calls execute on LogicManager.
Step 3. LogicManager then calls AddressBookParser#parseCommand(commandText) on the commandText String, which recognizes that it is an addc command.
Step 4. AddressBookParser then calls AddCommandParser#parse() on the command arguments.
Step 5. AddCommandParser then calls ParserUtil#parseContactTime() which parses the last contacted time and returns a LocalDateTime object called lastContactedTime.
Step 6. The lastContactedTime object is then passed to the Person constructor, which creates a new Person that calls the LastContactedTime constructor with it.
The following diagram summarizes steps 7 and 8:
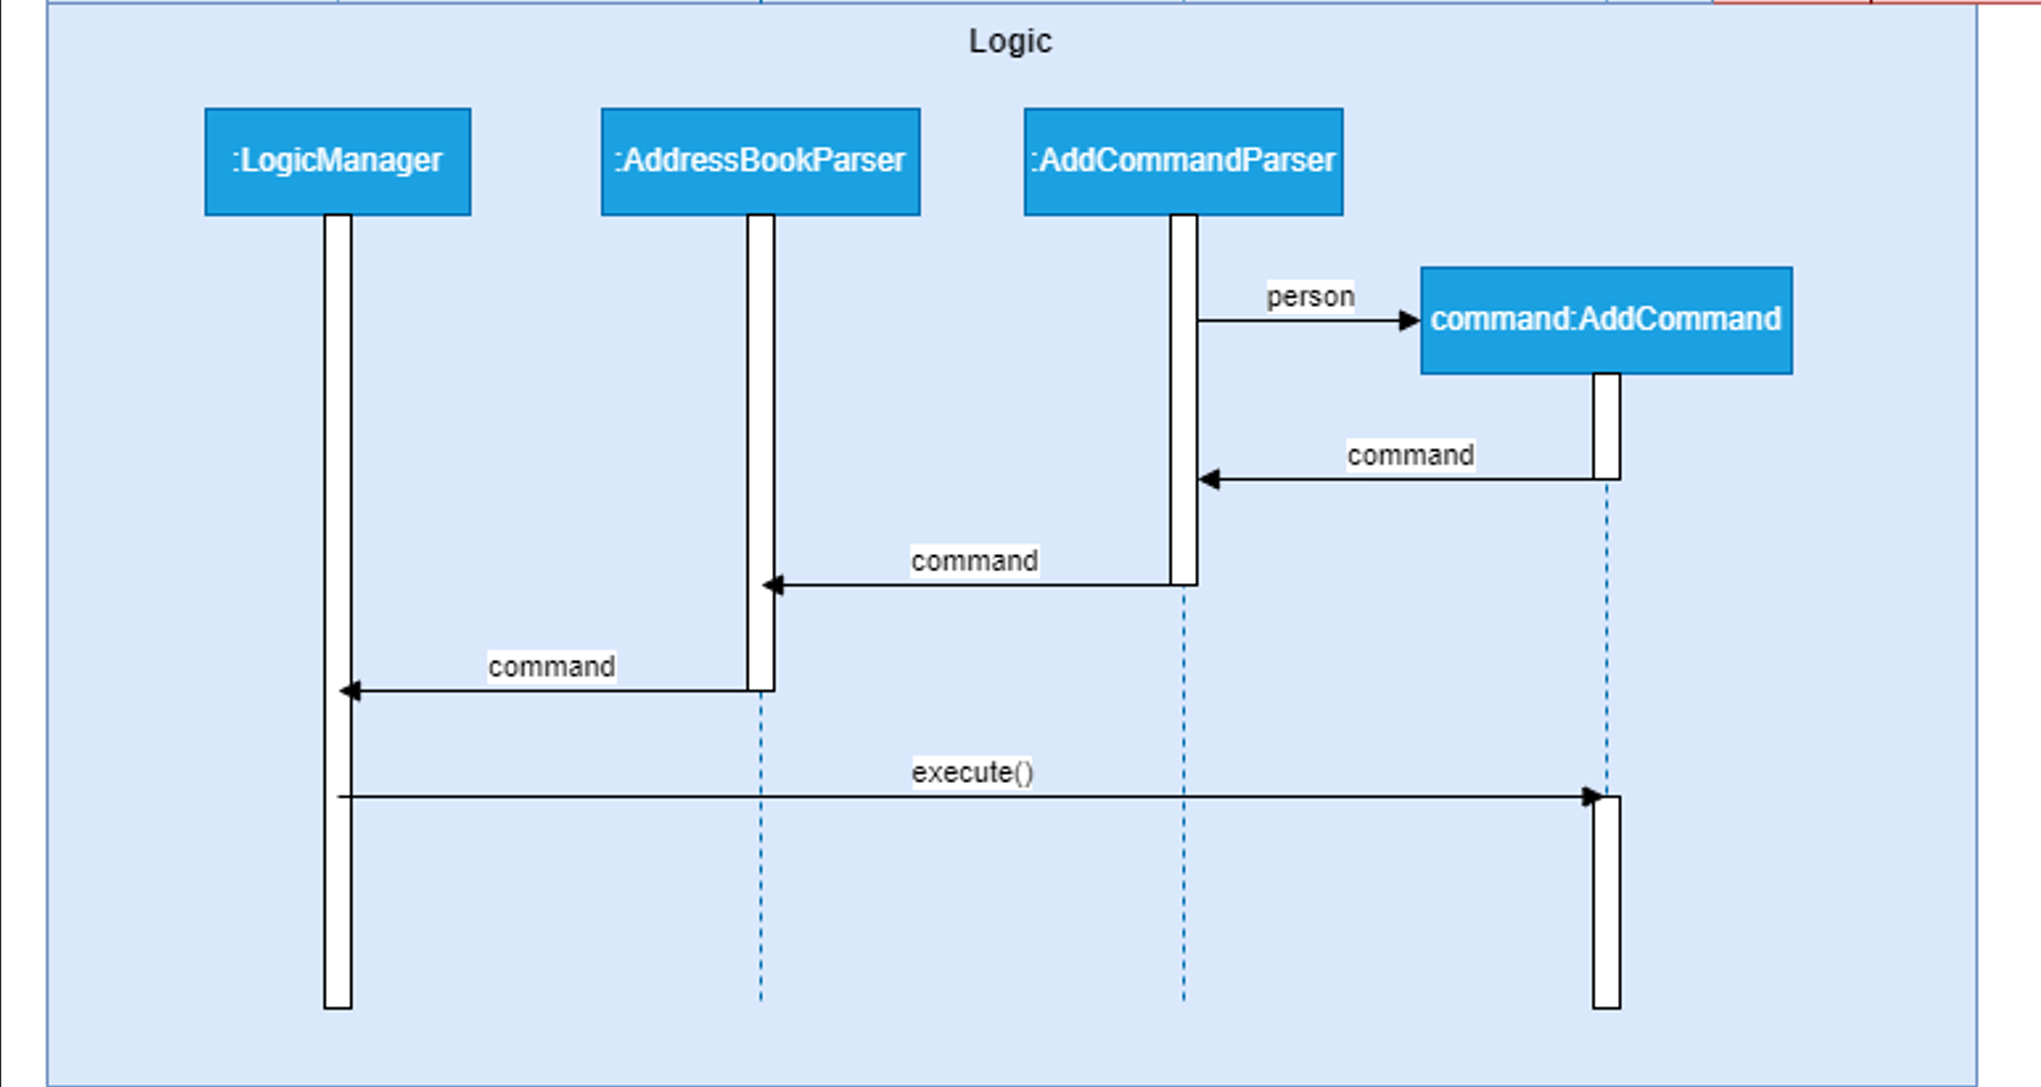
Step 7. The completed Person is passed to an AddCommand constructor which return a new AddCommand that can be executed.
Step 8. LogicManager then executes the AddCommand on the application model.
Step 9. Further execution is carried out, which like before adds the Person object to the list of Persons in the Model, and updates the Storage with this new Person.
Mark meeting as complete feature
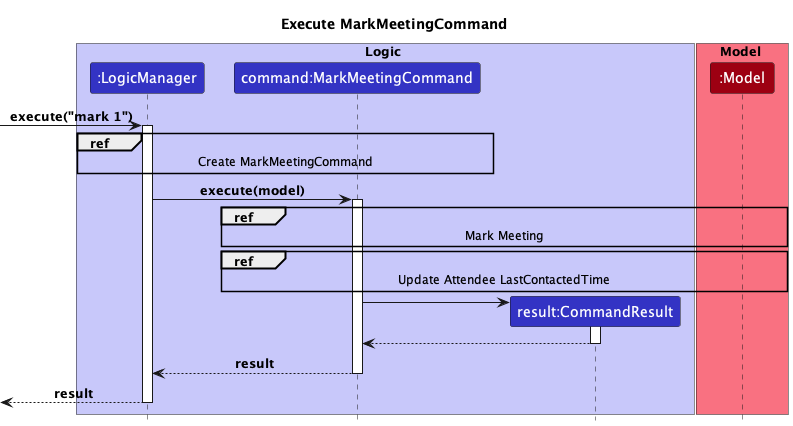
A meeting can be marked as complete using the mark command. The command also updates the last contacted time of its attendees to the ending time of the meeting, if the meeting end time is after the attendees current last contacted time.
This is the overall sequence diagram of marking a meeting as complete.
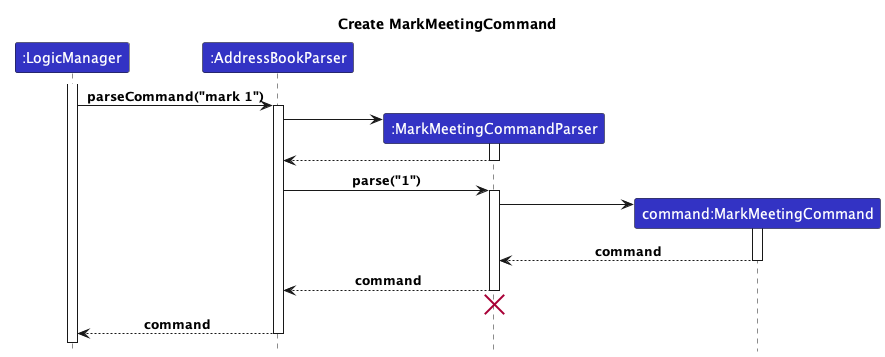
When a mark command is entered, it is first parsed by the respective Parsers to create a MarkMeetingCommand object.
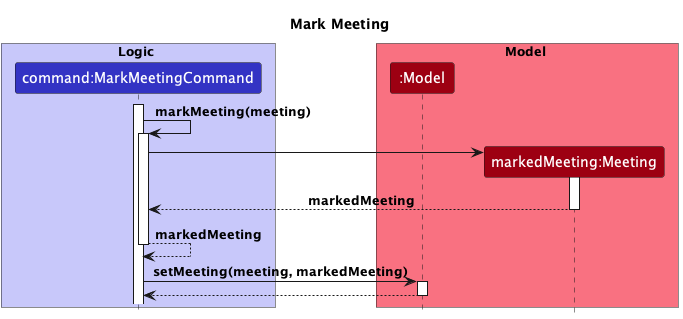
When the command is executed, the meeting is marked as complete by creating a new Meeting with the same fields except for status, and this meeting is updated to the Model.
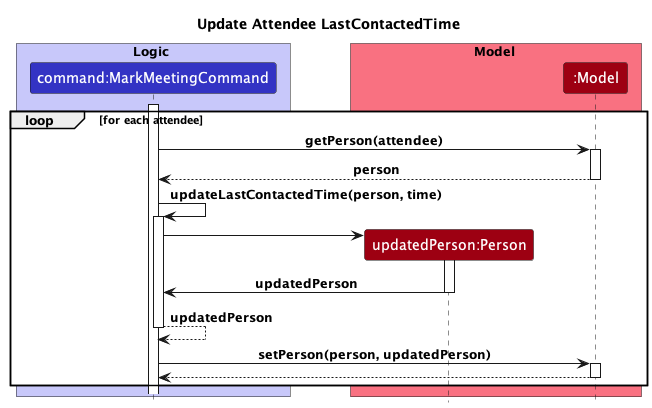
Following this, the last contacted time of all the attendees of the meeting are updated to the end time of the meeting.
Finally, a CommandResult is produced and returned to the LogicManager.
Contact Status feature
Each instance of Person contains an immutable Status object that allows the user to specify which stage of the insurance sales process a contact is at, if applicable.
At the current iteration of OutBook, a status must be one of NIL, Prospective, Active, Inactive, Renewal, Claimant (case-insensitive).
This is tailored according to the responsibilities of an insurance agent, which include:
- Promoting relevant insurance policies to prospective clients
- Keeping active clients updated on their policies
- Finding out why inactive clients did not renew their policies
- Sending renewal reminders to clients whose policies are approaching expiry
- Filing and following up on claims on behalf of their clients
The list of valid statuses is stored as an Enumeration object for the following benefits:
- Readability: e.g.
StatusList.NILis self-explanatory and easier to understand than something likeStatusList[0]if an index data structure were to be used. - Maintainability: If the list of valid statuses changes or expands in the future, it’s much easier to update an enumeration. This centralizes the changes in one place, making the code more maintainable compared to scattered string constants.
Status is implemented and utilized in a similar manner to LastContactedTime, as described here.
Saving data
-
The address book is saved in a JSON file after every command execution. The default path for this file is
/data/outbook.json, found in the same directly as the application JAR file. -
The JSON file should not be directly edited. Incorrectly editing the file will result in OutBook not being able to load the address book and data will be lost. If directly editing the file is deemed necessary, create a backup before doing so.
-
Under normal operation through the application, the JSON file will not become corrupted. If for any reason the file does become corrupted, OutBook will not be able to load the data and will display a blank address book.
-
If data recovery is to be attempted, do not execute any commands. Exit the application. Try to edit the JSON file such that it adheres to the parameters for each field. If data recovery is successful, OutBook will load the address book on boot.
-
If not, the data will be lost. The address book has can only be restored by executing commands through the application.
-
Planned Enhancements
[Proposed] Undo and redo feature
Proposed Implementation
The proposed undo/redo mechanism is facilitated by VersionedAddressBook. It extends AddressBook with an undo/redo history, stored internally as an addressBookStateList and currentStatePointer. Additionally, it implements the following operations:
-
VersionedAddressBook#commit()— Saves the current address book state in its history. -
VersionedAddressBook#undo()— Restores the previous address book state from its history. -
VersionedAddressBook#redo()— Restores a previously undone address book state from its history.
These operations are exposed in the Model interface as Model#commitAddressBook(), Model#undoAddressBook() and Model#redoAddressBook() respectively.
Given below is an example usage scenario and how the undo/redo mechanism behaves at each step.
Step 1. The user launches the application for the first time. The VersionedAddressBook will be initialized with the initial address book state, and the currentStatePointer pointing to that single address book state.

Step 2. The user executes delete 5 command to delete the 5th person in the address book. The delete command calls Model#commitAddressBook(), causing the modified state of the address book after the delete 5 command executes to be saved in the addressBookStateList, and the currentStatePointer is shifted to the newly inserted address book state.

Step 3. The user executes add n/David … to add a new person. The add command also calls Model#commitAddressBook(), causing another modified address book state to be saved into the addressBookStateList.

Model#commitAddressBook(), so the address book state will not be saved into the addressBookStateList.
Step 4. The user now decides that adding the person was a mistake, and decides to undo that action by executing the undo command. The undo command will call Model#undoAddressBook(), which will shift the currentStatePointer once to the left, pointing it to the previous address book state, and restores the address book to that state.

currentStatePointer is at index 0, pointing to the initial AddressBook state, then there are no previous AddressBook states to restore. The undo command uses Model#canUndoAddressBook() to check if this is the case. If so, it will return an error to the user rather
than attempting to perform the undo.
The following sequence diagram shows how the undo operation works:

UndoCommand should end at the destroy marker (X) but due to a limitation of PlantUML, the lifeline reaches the end of diagram.
The redo command does the opposite — it calls Model#redoAddressBook(), which shifts the currentStatePointer once to the right, pointing to the previously undone state, and restores the address book to that state.
currentStatePointer is at index addressBookStateList.size() - 1, pointing to the latest address book state, then there are no undone AddressBook states to restore. The redo command uses Model#canRedoAddressBook() to check if this is the case. If so, it will return an error to the user rather than attempting to perform the redo.
Step 5. The user then decides to execute the command list. Commands that do not modify the address book, such as list, will usually not call Model#commitAddressBook(), Model#undoAddressBook() or Model#redoAddressBook(). Thus, the addressBookStateList remains unchanged.

Step 6. The user executes clear, which calls Model#commitAddressBook(). Since the currentStatePointer is not pointing at the end of the addressBookStateList, all address book states after the currentStatePointer will be purged. Reason: It no longer makes sense to redo the add n/David … command. This is the behavior that most modern desktop applications follow.

The following activity diagram summarizes what happens when a user executes a new command:

Design considerations:
Aspect: How undo & redo executes:
-
Alternative 1 (current choice): Saves the entire address book.
- Pros: Easy to implement.
- Cons: May have performance issues in terms of memory usage.
-
Alternative 2: Individual command knows how to undo/redo by itself.
- Pros: Will use less memory (e.g. for
delete, just save the person being deleted). - Cons: We must ensure that the implementation of each individual command are correct.
- Pros: Will use less memory (e.g. for
[Feature Flaw] View Commands
As described in the implementation notes for viewc and viewm above, the currently displayed Person and Meeting objects will be cleared when certain commands such as deletec and deletem are used on a separate object, which is necessary due to the way the view commands are currently implemented. Additional details are in the implementation section referenced above.
We plan to remove the need to handle such edge cases by modifying the way both view commands are implemented. One potential method is as follows:
- Revert the implementation of
viewcandviewmto the original method of storing a copy of the viewed object, rather than the viewed index. - Modify the behaviour of
editc,editm,deletecanddeletemsuch that when they are used on the original object currently being viewed, the stored copy will be edited/deleted accordingly. - This allows the currently viewed
PersonorMeetingobject to persist regardless of command usage, and only be cleared when the object is deleted, or everything is cleared via theclearcommand.
Effort
Effort in Model and Storage
Compared to AB3, which only deals with 1 entity type, Person. OutBook deals with 2 entity types and allows significant interaction between them. This means that the model had to be extended and storage had to follow along with it. jackson does not allow storage of pointers, thus it became necessary to work around that using the unique fields on both Person and Meeting.
Effort in reducing coupling
Compared to AB3, where there were no interaction between entities. OutBook was designed for professionals to manage both their contacts and their meetings, this inherently means that there needs to be interaction between both entities. This interaction increases coupling and decreases cohesion. In order to combat this, many instances of facade, command and observer design patterns were used.
Effort in implementing many features
OutBook needed to make managing contacts and meetings an efficient process, this meant that there needed to be many quality of life features to make the professional’s life easier. Therefore, much effort was dedicated to making data easily retrievable by making almost every field searchable.
Effort in managing interactions between entities
OutBook required one meeting to interact with many other contacts and for one contact to interact with many other meetings. Because of the interactions between both classes, a change in 1 object must be reflected in everything that references the object while still being immutable. This required thorough testing and analysis to keep track of the interactions and account for them while we were adding more features.
Documentation, logging, testing, configuration, dev-ops
Appendix: Requirements
Product scope
Target user profile:
- has many meetings to keep track of
- has a need to manage a significant number of contacts
- wants to organise meetings and contacts
- can type fast and is comfortable using CLI
Value proposition: manage and organise contacts and meetings faster than a mouse/GUI driven app
User stories
Priorities: High (must have) - * * *, Medium (nice to have) - * *, Low (unlikely to have) - *
| Priority | As a … | I want to … | So that I can… |
|---|---|---|---|
[EPIC] |
agent who has meetings | have a meeting schedule | keep track of them |
* * * |
agent | create new meetings | |
* * * |
agent | delete meetings | |
* * * |
agent | view meetings | |
* * * |
agent | view a specific meeting | see more details |
* * |
agent | edit a meeting | change its details |
* * |
agent | sort my meetings by date | see which ones come first |
* |
agent | mark meetings as complete | know which meetings are done |
[EPIC] |
agent who has clients | have an address book | keep track of them |
* * * |
agent | create new contacts | |
* * * |
agent | delete contacts | |
* * * |
agent | view contacts | |
* * * |
agent | view a specific contact | see more details |
* * |
agent | edit a contact | change its details |
* |
agent | assign named tags to meetings | organise meetings |
* |
agent | filter meetings by tags | view related meetings together |
[EPIC] |
agent who meets with clients | schedule meetings with contacts | keep track of the client I am meeting |
* * * |
agent | add contacts to meetings | |
* * * |
agent | remove contacts from meetings | |
* * * |
agent | view contacts in meetings | |
* * |
agent | mark meetings as complete | know which meetings are still pending |
* |
agent who wants to meet clients regularly | know the last contacted date | when to touch base with a client |
Use cases
Use case: Add a contact to a meeting
MSS
- User requests to list meetings.
- OutBook shows a list of meetings.
- User requests to list contacts.
- OutBook shows a list of contacts.
- User requests to add a specific contact to a specific meeting.
-
OutBook adds the contact to the meeting.
Use case ends.
Extensions
-
2a. The list of meetings is empty.
Use case ends.
-
4a. The list of contacts is empty.
Use case ends.
-
5a. The given meeting index is invalid.
-
5a1. OutBook shows an error message.
Use case resumes at step 2.
-
-
5b. The given contact index is invalid.
-
5b1. OutBook shows an error message.
Use case resumes at step 4.
-
-
5c. The contact is already in the meeting.
-
5a1. OutBook shows an error message.
Use case ends.
-
Use case: Remove contact from a meeting
MSS
- User requests to list meetings.
- OutBook shows a list of meetings.
- User requests to view details of a specific meeting.
- OutBook shows the details of the meeting.
- User requests to remove a specific contact from the meeting.
- OutBook removes the contact from the meeting.
- User requests to remove a specific contact from the meeting.
-
OutBook removes the contact from the meeting.
Use case ends.
Extensions
-
2a. The list of meetings is empty.
Use case ends.
-
3a. The given meeting index is invalid.
-
3a1. OutBook shows an error message.
Use case resumes at step 2.
-
-
4a. There are no contacts in the meeting.
Use case ends.
-
5a. The given meeting index is invalid.
-
5a1. OutBook shows an error message.
Use case resumes at step 2.
-
-
5b. The given contact index is invalid.
-
5b1. OutBook shows an error message.
Use case resumes at step 3.
-
Use case: Mark meeting as complete
MSS
- User requests to mark a specific meeting as complete
- OutBook marks the specific meeting as complete
-
OutBook updates the last contacted date of attendees to the meeting date
Use case ends.
Extensions
-
1a. The given meeting index is invalid.
-
1a1. OutBook shows an error message.
Use case resumes from the start.
-
-
1b. The given meeting is already marked complete.
-
1b1. OutBook shows an error message.
Use case ends.
-
Non-Functional Requirements
Performance
- Should be able to respond to user input within 2 seconds under normal operating conditions.
- Should be able to handle a database of up to 1000 contacts and 500 meetings without a significant performance degradation.
Reliability
- Data integrity should be ensured under any usage conditions through automatic data backup.
Usability
- A user with above average typing speed for regular English text (i.e. not code, not system admin commands) should be able to accomplish most of the tasks faster using commands than using the mouse.
- Application GUI should be intuitive wherever possible, to reduce training for new users.
Documentation
- User documentation should include a comprehensive user manual.
- Developer documentation should cover the architecture, code structure, and guidelines for future development.
Compatibility
- Should work on any mainstream OS as long as it has Java
11or above installed.
Glossary
- User Interface (UI): The point of interaction between a user and a software application, with both graphical and non-graphical elements.
- Application Programming Interface (API): A set of rules and tools allowing different software applications to communicate and exchange information.
- Command Line Interface (CLI): A text-based interface for interacting with a computer program or operating system, where users enter commands.
- Graphical User Interface (GUI): A visual interface using graphical elements like windows, icons, and buttons for user interaction with a software application.
- Mainstream OS: Windows, Linux, Unix, OS-X
- Private contact detail: A contact detail that is not meant to be shared with others
Appendix: Instructions for manual testing
Given below are instructions to test the app manually.
Launch and shutdown
Initial launch
-
Download the jar file and copy into an empty folder
-
In your terminal, navigate to the folder.
-
Run the file with
java -jar OutBook.jar.
Saving window preferences
-
Resize the window and/or move the window.
-
Close the window.
-
Re-launch the app by double-clicking the jar file.
Expected: The most recent window size and location is retained.
Exiting
- Input command
exit.
Expected: OutBook closes and shutdown.
Adding a person
Adding a person while all persons are being shown
-
Prerequisites: List all persons using the
listccommand. Multiple persons in the list. -
Test case:
addc n/John Doe p/12345678 e/JohnDoe@gmail.com
Expected: Contact John Doe is created wth phone number 12345678 and email JohnDoe@gmail.com. The contact should be the first in the list as it does not have a last contacted date. Details of the added contact shown in the status message. -
Test case:
addc n/John Not Doe p/87654321 e/JohnNotDoe@gmail.com lc/10.10.2023 1000 s/Active t/tagOne
Expected: Details of the added contact shown in the status message. -
If you were to repeat 2 or 3 above, an error while be shown due to duplicate entries.
-
Test case:
addc n/John Doe
Expected: No person is added. Error details shown in the status message. -
Test case:
addc p/12345678
Expected: Similar to 5. -
Test case:
addc e/JohnDoe@gmail.com
Expected: Similar to 5. -
Other incorrect delete commands to try:
addc,addc 1and anyaddccommand that does not haven/NAME,p/PHONE_NUMBER&e/EMAIL
Expected: Similar to 5.
Adding a person while not all persons are being shown.
-
Prerequisites: Filter the contact list by using the
findccommand. If you are using the default data given, inputfindc n/Yu.
Expected: Only Bernice Yu is shown in the contact list. -
Add a person using the
addccommand with correct parameters. -
Adding a contact automatically shows all contacts.
Editing a person
-
Test case:
editc 1 n/John Doe p/12345678 e/JohnDoe@gmail.com
Expected: The first person in the contact list is has its details replaced with the given arguments. Details of the added contact shown in the status message. -
If you were to edit a contact so that it has the same name or phone number or email to any other contact, you will encounter a duplicate error
-
Other incorrect delete commands to try:
editcandeditc 1, you will receive a required index error and a required field error.
Viewing a contact
View contact
- Use
viewc 1to view the first contact
Expected: the first contact will have its details shown on the details panel.
View contact while contact is being edited
- Use
viewc 1to view the first contact
- Edit the first contact to have a later last contacted date than the second contact.
Expected: The second contact will be sorted to the top of the list, and the details of this contact will be displayed instead.
Deleting a person
Deleting a person while all persons are being shown
-
Prerequisites: List all persons using the
listccommand. Multiple persons in the list. -
Test case:
delete 1
Expected: First contact is deleted from the list. Details of the deleted contact shown in the status message. -
Test case:
delete 0
Expected: No person is deleted. Error details shown in the status message. -
Other incorrect delete commands to try:
delete,delete x,...(where x is larger than the list size)
Expected: Similar to 3.
Deleting a person while the list of persons is filtered.
-
Prerequisites: Filter the contact list by using the
findccommand. If you are using the default data given, inputfindc n/Yu.
Expected: Only Bernice Yu is shown in the contact list. -
Test case:
delete 1
Expected: Bernice Yu is deleted from the list. Nothing should be shown in the list. Details of the deleted contact shown in the status message. -
Test case:
delete 0
Expected: No person is deleted. Error details shown in the status message. -
Other incorrect delete commands to try:
delete,deletec X(where X is larger than the list size)
Expected: Similar to 3.
Meeting Tests
Repeat the contact test cases with meeting commands
- Add Meeting commands
addm m/Test Meeting 1 a/Test Location 1 s/02.10.2023 1000 e/02.10.2023 1200 - Find Meeting commands
findm m/Meeting - Edit Meeting commands
editm m/Changed Meeting Name - Delete Meeting commands
deletem 1 - View Meeting commands
viewm 1
Meeting Attendees
Add Meeting Attendee
- Use
addmc 1 2
Expected: The second person in the current person list will be added to the first meeting in the current meeting list. - Instead of using 1 or 2, use indexes that are more than the amount of meetings or persons.
Expected: An error will be shown which indicated the index which is out of bounds. - Repeat 1 and 2 with filtered lists using
findcandfindm
Remove Meeting Attendee
- Prerequisite: There must be an attendee in the meeting you are looking at. To look at the attendees for a meeting, use
viewmon the meeting. In this case we will look at the first meeting. - The attendees will be listed with an index in the meeting. Use
rmmc 1 1.
Expected: The meeting will have its first attendee removed.
Mark Meetings
Mark a Meeting as completed
- Use
mark 1to mark the first meeting as completed
Expected: Meeting will be shown as completed and the attendees that are in the meeting will have their last contacted updated to the end time of the meeting.
Data Storage
No save file
-
Launch OutBook
Expected: The default address book is loaded. -
Execute a command
Expected: A JSON file is created at the save location, by default/data/outbook.json
Save file present
-
Launch OutBook
Expected: The saved address book is loaded. -
Execute a command
Expected: The JSON is updated according to the command.
Save file present but corrupted
-
Launch OutBook
Expected: A blank address book is loaded. -
Execute a command
Expected: The save file is overridden with the new address book.